Use System Settings to configure all system-related settings for optimal performance and security. You can set up SMTP for email alerts, NTP to synchronize your Logpoint’s time with a network timeserver, and HTTPS for safe access to Logpoint. Use General to update general Logpoint information and Support Connection for encrypted communication with Logpoint support. Additionally, Logpoint can be configured to operate as a Logpoint Collector or Syslog Forwarder for log handling and forwarding.
Go to Settings >> System Settings from the navigation bar and click System Settings.
Select General.
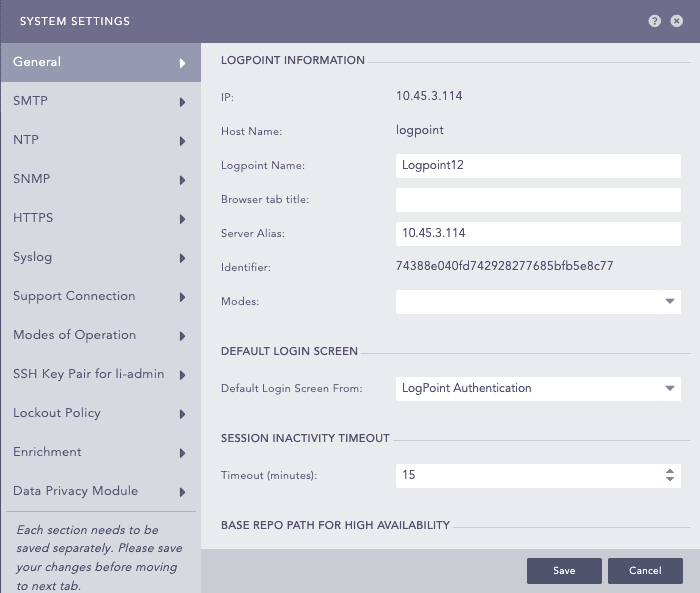
General - System Settings
In LOGPOINT INFORMATION,
Enter a Logpoint Name.
Enter a Browser tab title, this title is appended to the title of the tab.
Enter or update the Server Alias. Updating it does not change the Logpoint IP Address or the DNS.
Identifier is the unique value given to each Logpoint.
Leave the Modes dropdown as is. Modes is for a future Logpoint Director (Director Console) release.
In DEFAULT LOGIN SCREEN,
Select the Default Login Screen for the Logpoint.
In SESSION INACTIVITY TIMEOUT,
In Timeout (minutes), enter a time (in minutes) when Logpoint users are timed out.
In BASE REPO PATH fOR HIGH AVAILABILITY,
Enter path to alter the default path /opt/immune/storage/. It is the base path for the repos from the remote machine.
In APPLY TIME RANGE ON,
Select either Collection Timestamp (col_ts) or Log Timestamp (log_ts). The col_ts is the time when the log was collected in Logpoint, and the log_ts is the time when a device generated the log. The time conversion of log_ts occurs when a Normalization Policy is applied to the appropriate Collectors/Fetchers. Either log_ts or col_ts is displayed on the top of each row of the search results in addition to the search graph, depending on what you selected. Search results have both.
Select an Over Scan Period (in minutes) and a Time Zone. The overscan period is time added to a log search. Collection and Log Timestamps are displayed in the timezone you selected according to UTC. The Time Range is applied to either the Collection Timestamp or the Log Timestamp across all Distributed Logpoints.
Select a Time Zone.
In SOAR,
Select Enable SOAR in Logpoint to enable incident investigation with Playbooks and Cases. Go to Getting Started with SOAR for details. Enabling or disabling SOAR may take some time depending on available memory. SOAR is always disabled in the Logpoint Collector and Syslog Forwarder modes.
In USAGE DATA,
Logpoint collects and analyzes anonymized usage data by default. However, it does not collect Personally Identifiable Information (PII) data. If you don’t want to share your usage data, deselect Share Usage Data.
Click Save.
SMTP (Simple Mail Transfer Protocol) is a communication protocol used for sending emails of Logpoint alerts and incidents. If your mail server supports encryption, StartTLS encrypts the connection and sends emails in encrypted format. You will also need to configure SMTP before using the Data Privacy Module.
To configure SMTP:
Go to Settings >> System Settings from the navigation bar and click System Settings.
Select SMTP.
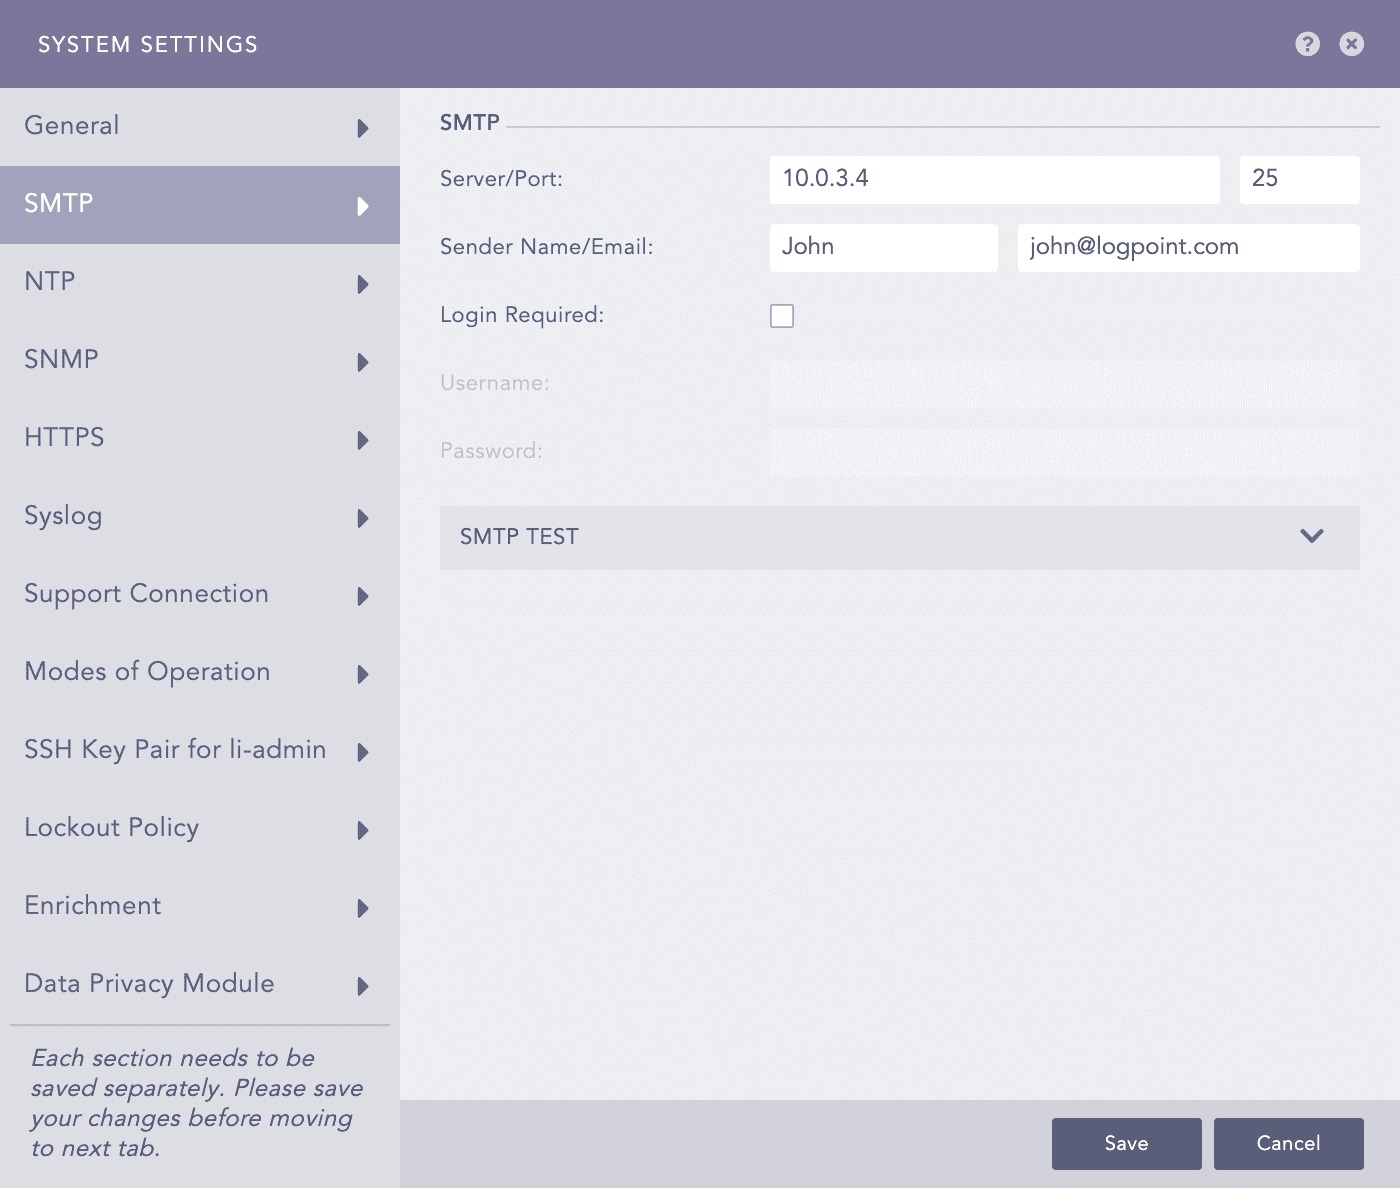
SMTP - System Settings
In Server/Port, enter the IP address and port number of your mail server.
Enter Sender Name and an Email address.
If you enable Login Required, enter Username and Password.
Click Save.
To test the configuration:
Click SMTP TEST.
Enter the Subject of the test e-mail.
Enter an Email address.
Enter a Message.
Click Test SMTP.

SNMP Test
NTP synchronizes the time of your Logpoint with a network timeserver.
Go to Settings >> System Settings from the navigation bar and click System Settings.
Select NTP.
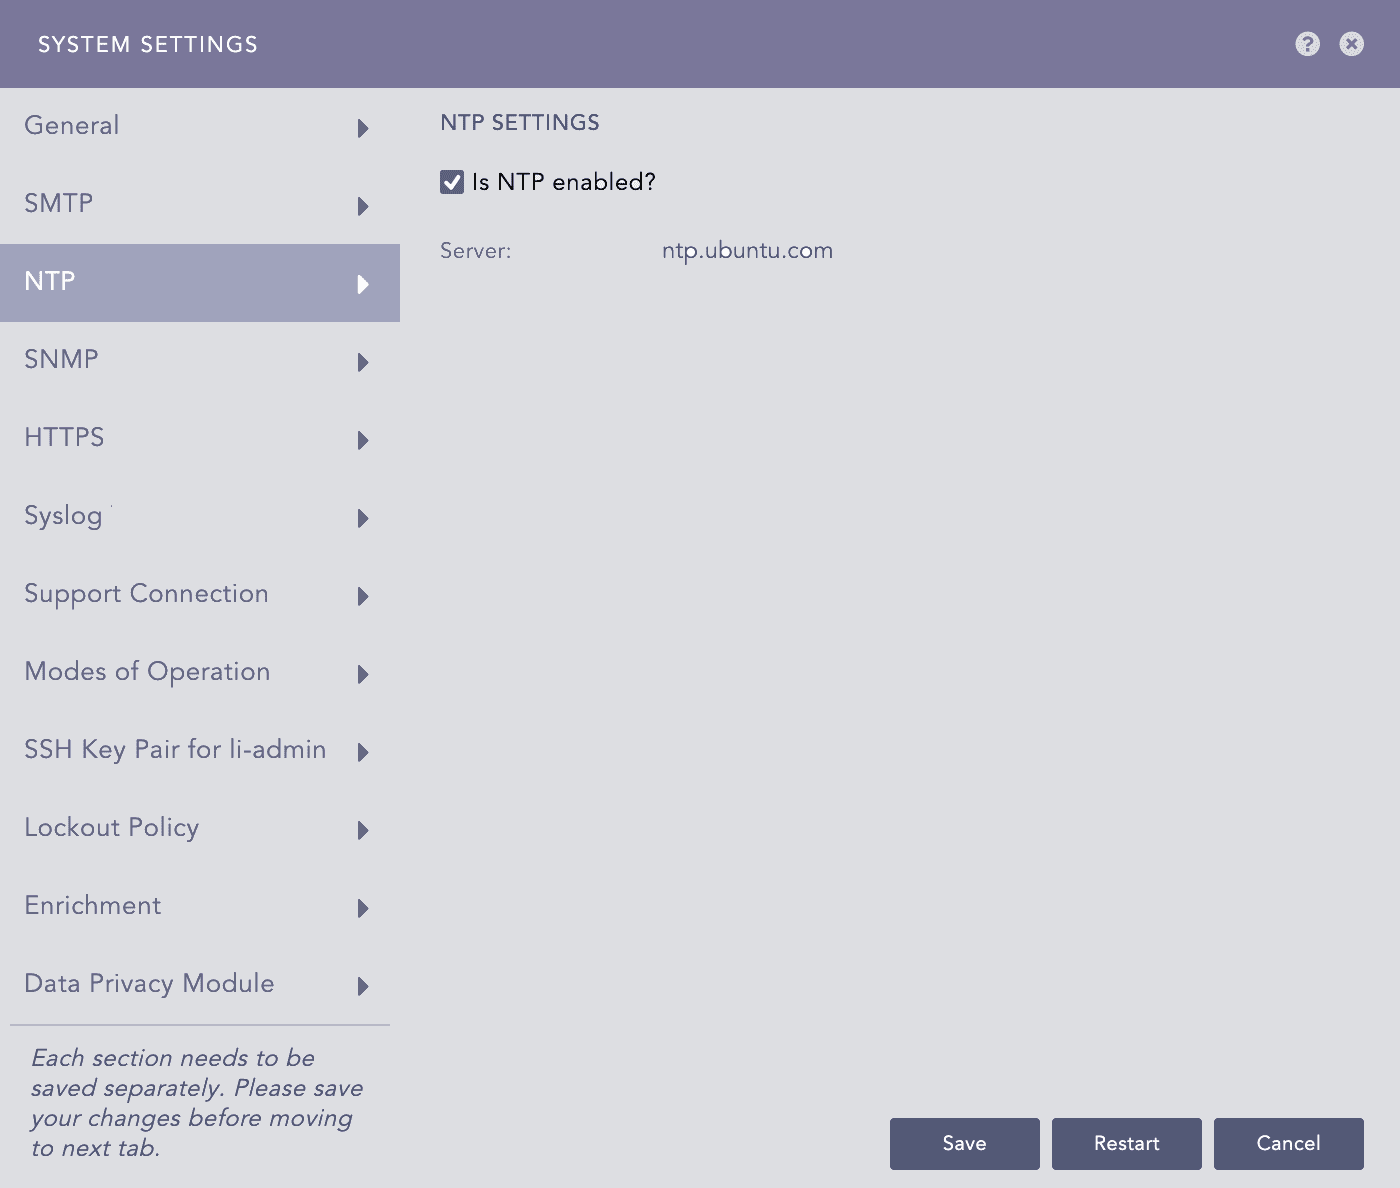
NTP - System Settings
Select Is NTP enabled?.
Enter the Server address. You can add multiple server addresses by clicking the plus icon.
Click Save.
SNMP allows you to monitor various metrics of Logpoint. To see the list of metrics you can monitor by enabling SNMP, go to SNMP Monitoring. If you enable the SNMP, your Logpoint listens to the OIDs that are forwarded to the 161 port.
To enable SNMP:
Go to Settings >> System Settings from the navigation bar and click System Settings.
Select SNMP.
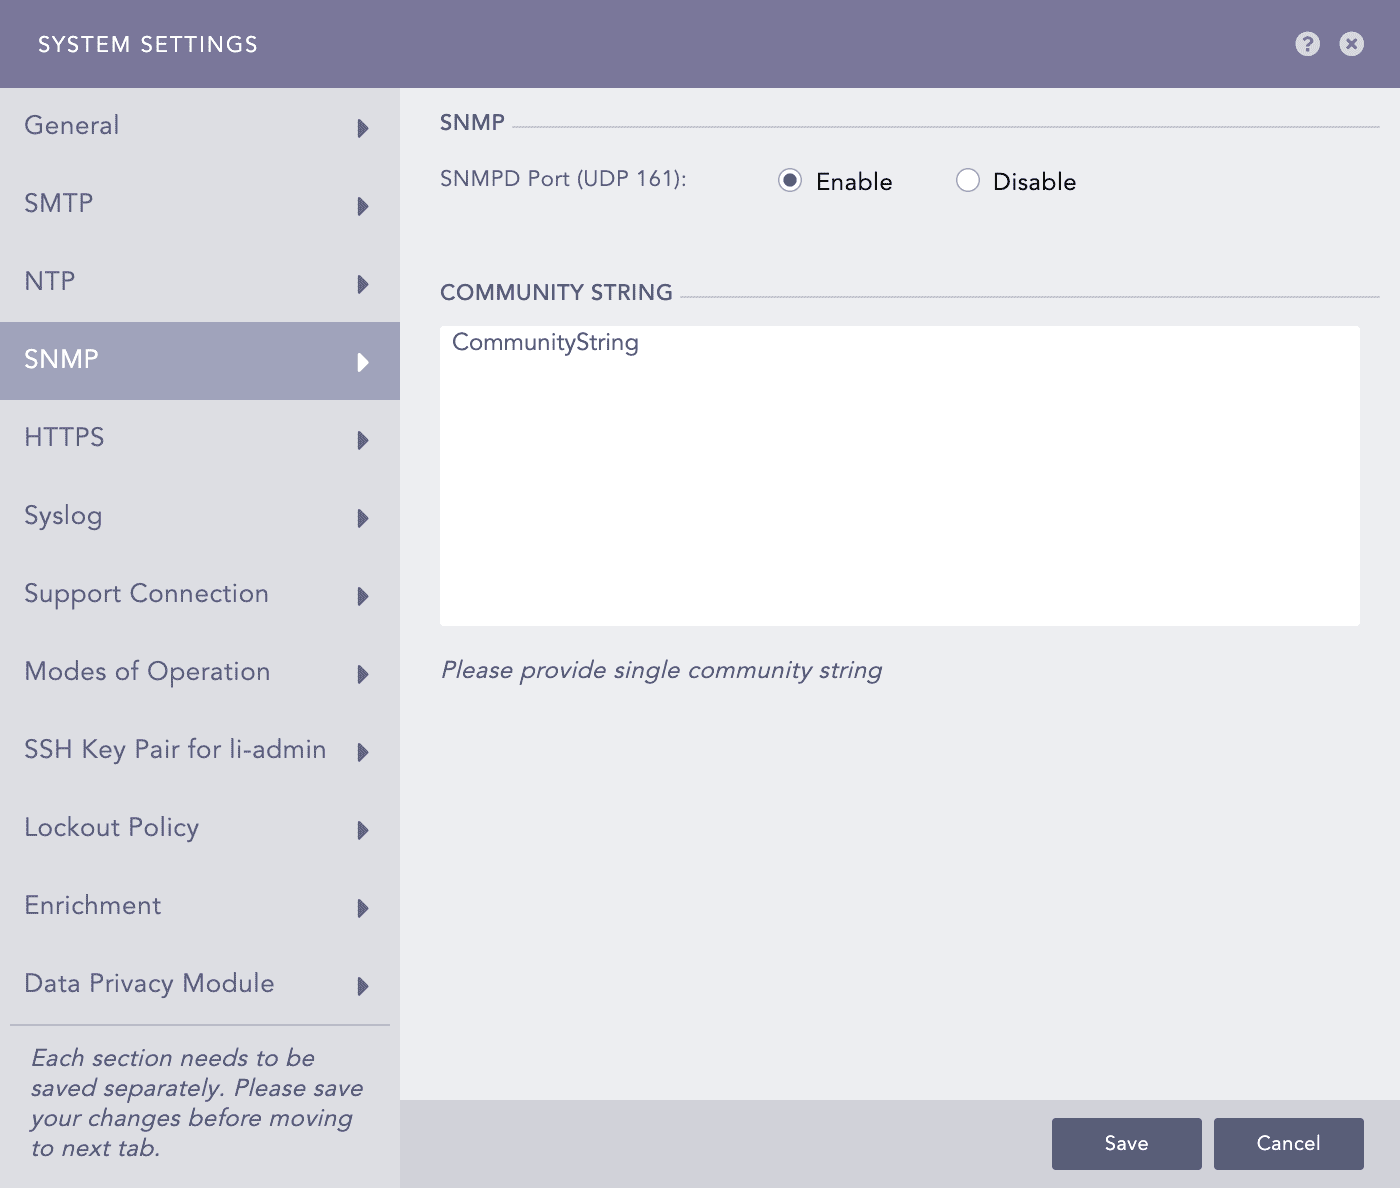
SNMP - System Settings
Select Enable.
Enter a Community String. The SNMP community string in Logpoint is a read-only community string that authenticates Logpoint. Use this community string in your SNMP clients to query Logpoint and retrieve information.
Click Save.
Logpoint provides a default self-signed SSL (Secure Sockets Layer) certificate, which allows secure data transfer to and from Logpoint. This certificate uses a private key that is the same for all Logpoint instances. So, for compliance and stronger security, you can generate and upload custom SSL certificates, ensuring that each instance has a unique private key and more secure communication via HTTPS. The custom certificate must have 2048 bits, a .crt extension and must meet the PEM encoded x.509 standard. The key file of the certificate must have a .key extension.
To generate the private key:
openssl genrsa -out private.key 2048
To create the custom signed certificate:
req -new -sha256 -key private.key -out logpointserver.csr
To upload the certificate:
Go to Settings >> System Settings from the navigation bar and click System Settings.
Select HTTPS.
Click Browse to find and select the Certificate.
Click Browse to find and select the Key.
Click Save.
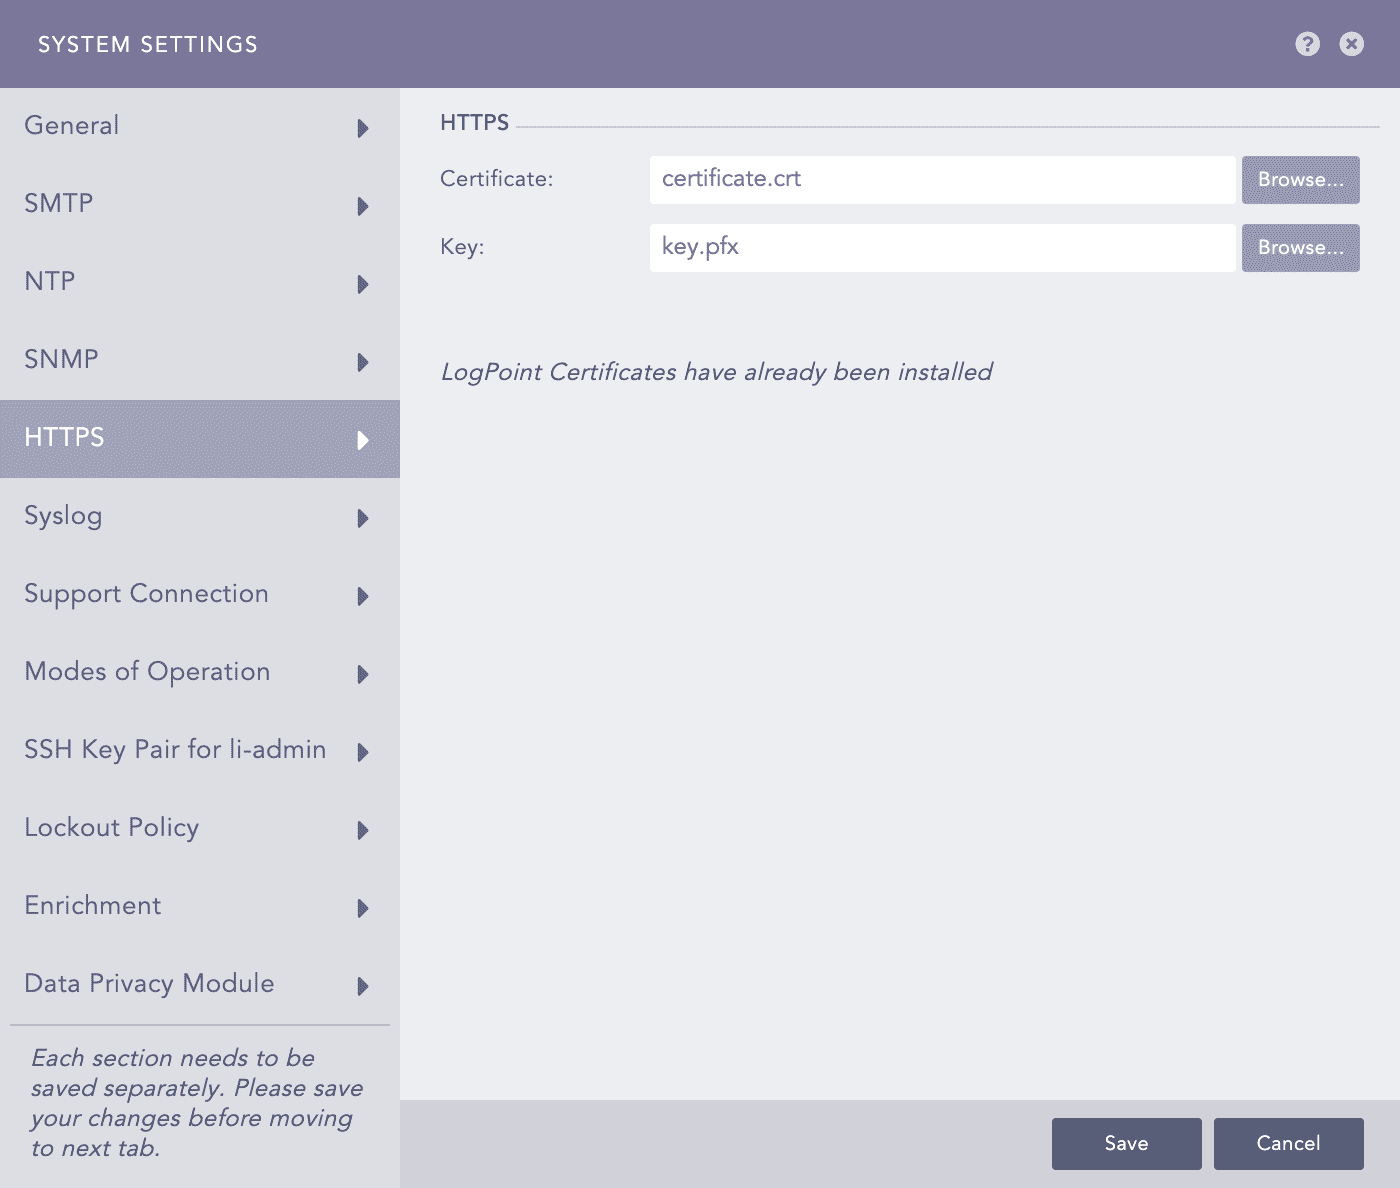
HTTPS - System Settings
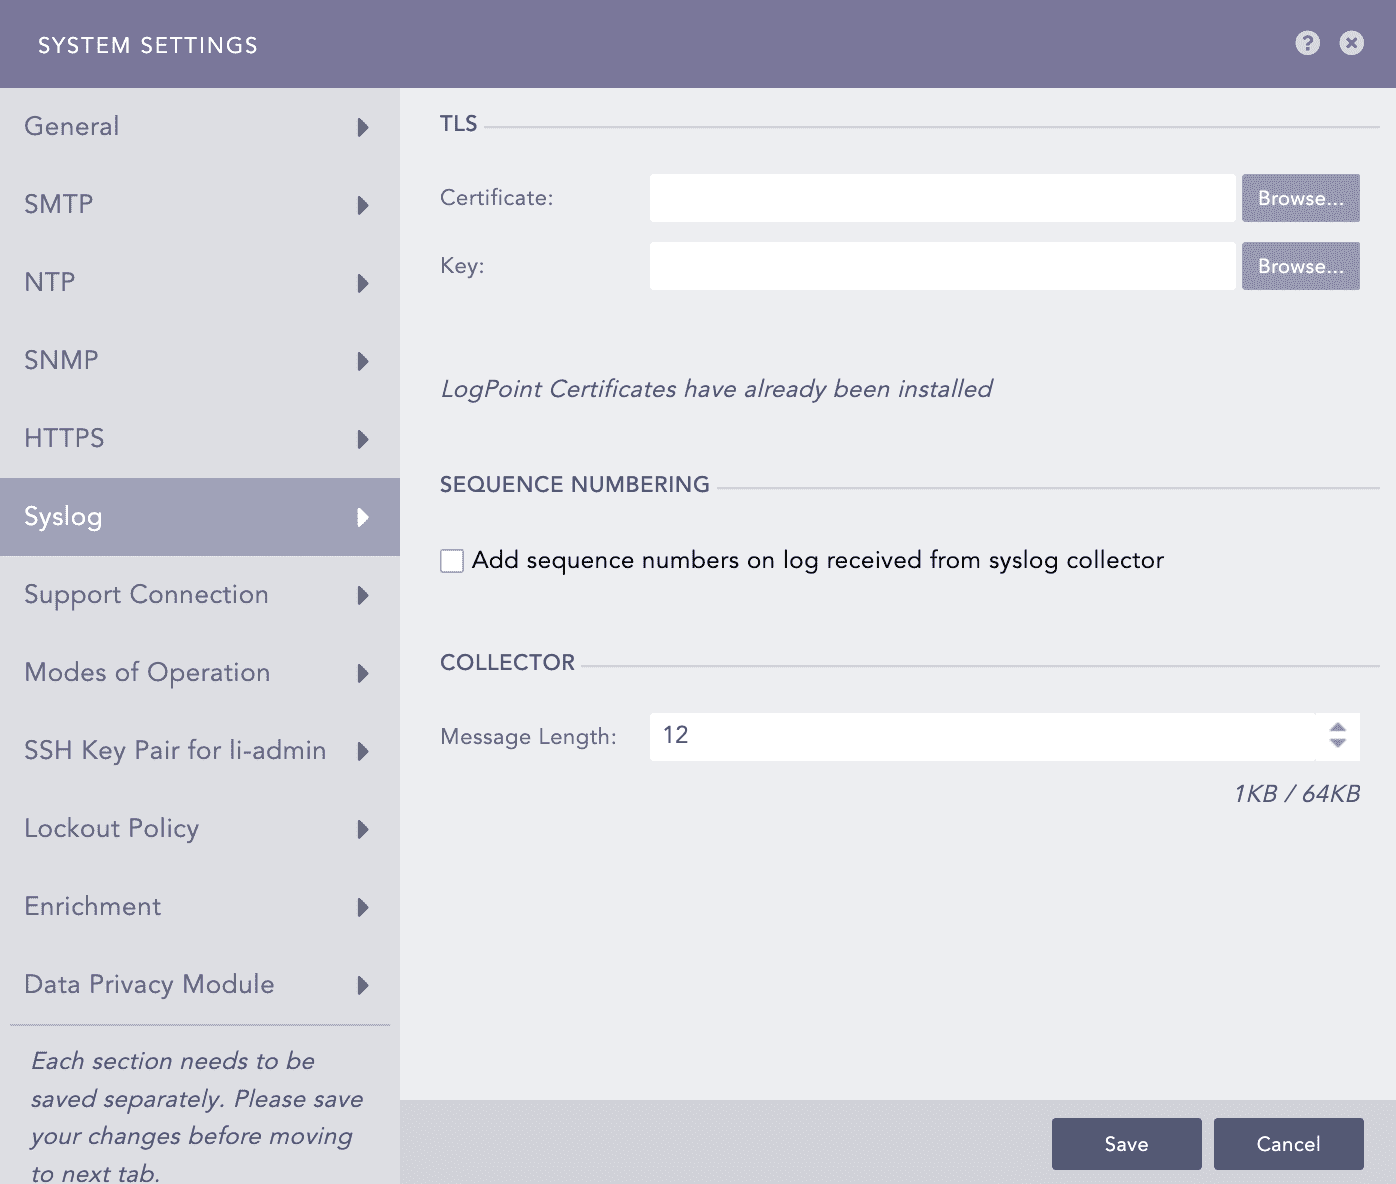
You can add a custom TLS(Transport Layer Security) certificate for log collection via Syslog. The syslog collector uses this certificate to maintain the confidentiality and authenticity of the logs transmitted on port 6514. To learn how to generate the custom certificate and key, refer to HTTPS.
To upload the certificate:
Go to Settings >> System Settings from the navigation bar and click System Settings.
Select Syslog.
Syslog TLS - System Settings
Upload your TLS Certificate and Key.
Enable Add sequence numbers on log received from syslog collector to provide a sequence number to the syslogs. The number is assigned on a device per protocol basis to each log collected from the Syslog Collector.
In Message length, you can define the size for Syslog messages. The maximum message size can be 64 KB, with a default size of 12 KB. Any message that exceeds the maximum size is divided into multiple events and shortened at the defined size. For example, if the message length is 40 KB, logs larger than that size are chunked into 40 KB segments.
Click Save.
The Support Connection creates an encrypted end-to-end communication channel between Logpoint and Logpoint support. It is used by Logpoint Support to understand, troubleshoot, and fix the issues on your deployment issues.
Before enabling support connection, make sure that your firewall is not blocking the connection from your Logpoint to the following:
Domain |
Port |
|---|---|
reverse.logpoint.com |
1193/UDP |
customer.logpoint.com |
443/TCP |
Go to Settings >> System Settings from the navigation bar and click System Settings.
Select Support Connection.
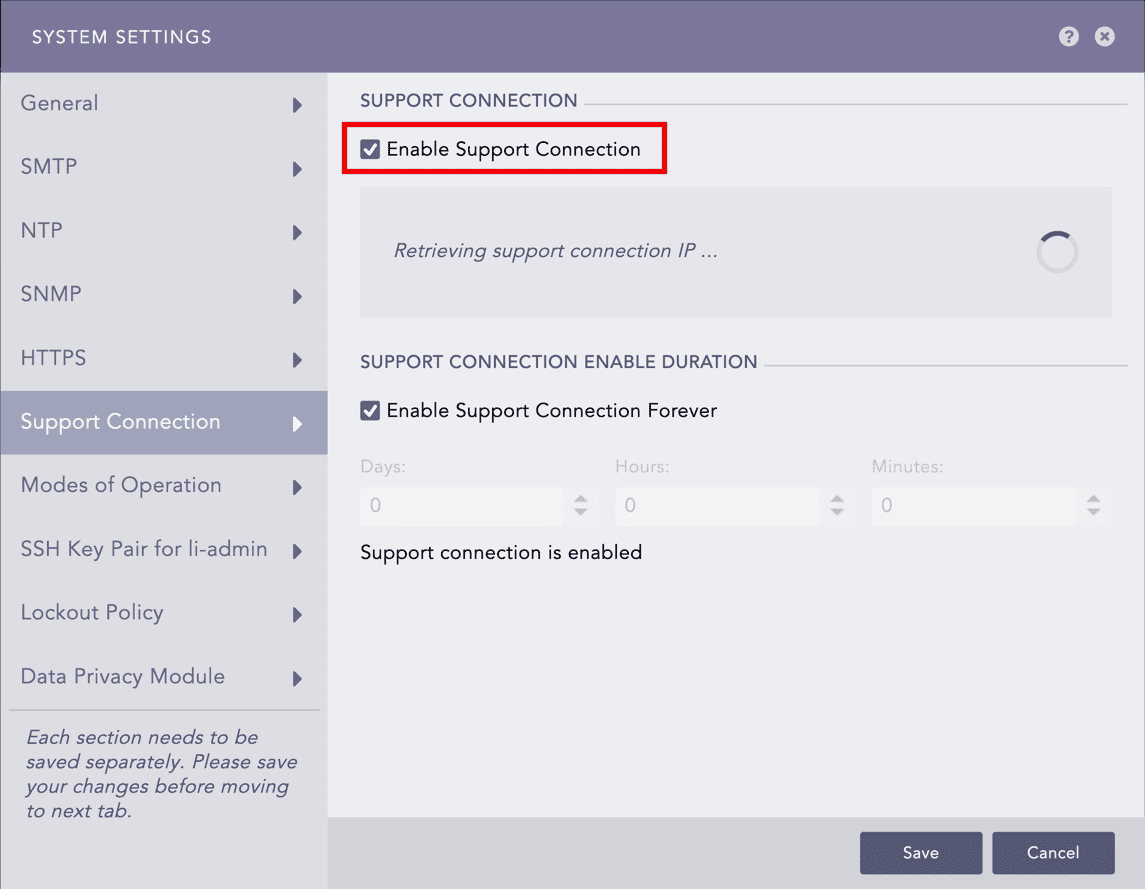
Enabling Support Connection
Select Enable Support Connection. Logpoint starts retrieving the support connection IP.
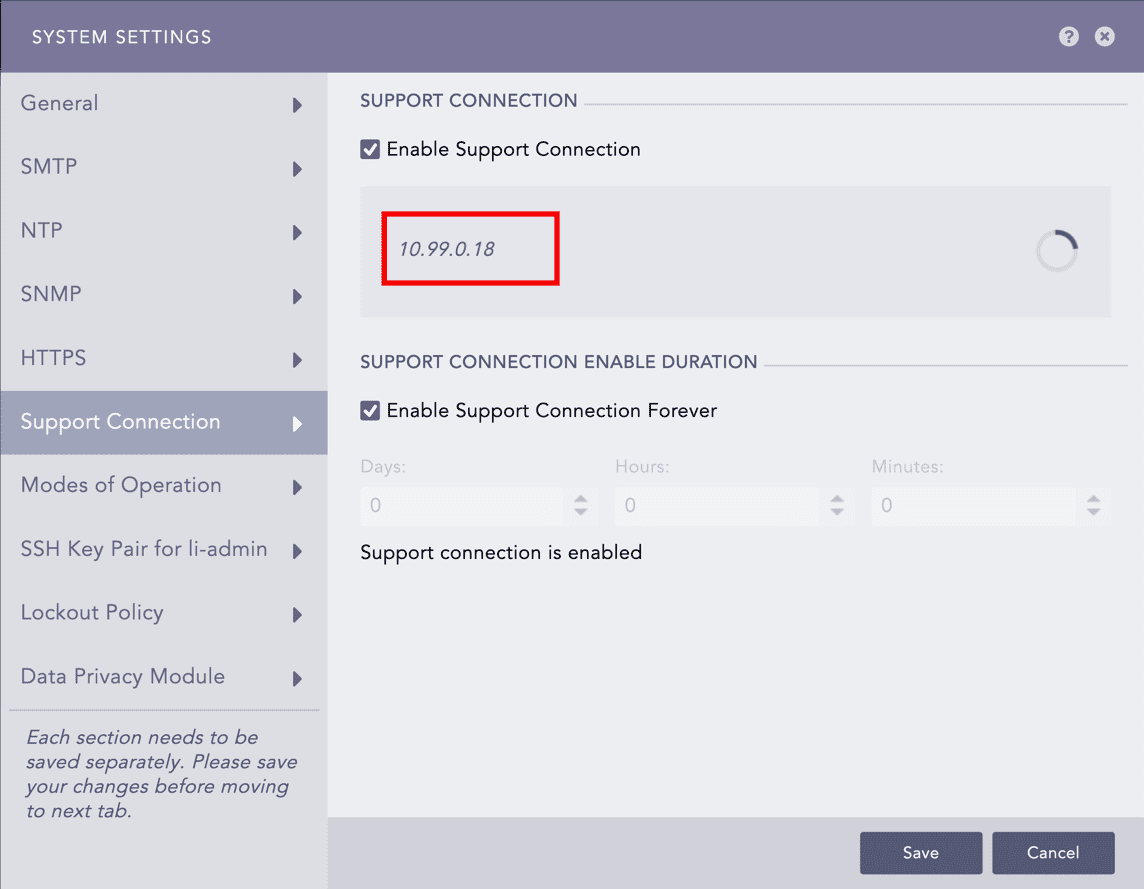
Retrieved Support Connection IP
Enter the retrieved support connection IP to the Logpoint Support team.
Enter the Support Connection Enable Duration. The support session expires after it exceeds the duration. Support connection never expires if you select 0:0:0 as the time duration, or Enable Support Connection Forever.
Click Save.
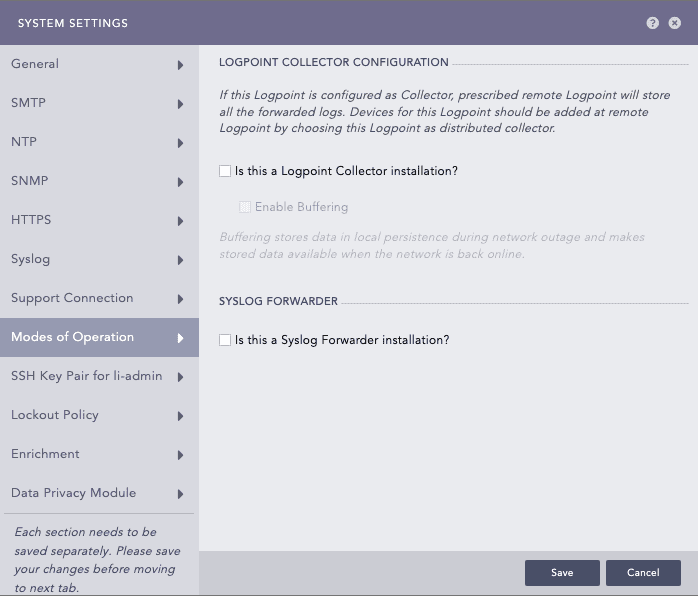
Modes of Operation allow you to convert a standard Logpoint into a Logpoint Collector or a Syslog Forwarder. This flexibility enables tailored configurations for effective log collection and forwarding across distributed environments.
Modes of Operation - System Settings
Logpoint Collector collects logs from different sources, normalizes them using the signatures applied, and forwards them to a configured remote Logpoint. The remote Logpoint configures the sources and the storage locations for the logs. Logpoint Collector can only collect the logs. Therefore, it does not contain the Dashboards, the Search, the Report, and the Logpoint SOAR sections. The name of each Logpoint node must be unique in a distributed deployment.
You need at least two Logpoint servers, one as the Collector and another as the Main Logpoint.
Go to Settings >> System Settings from the navigation bar and click System Settings.
Select Modes of Operation.
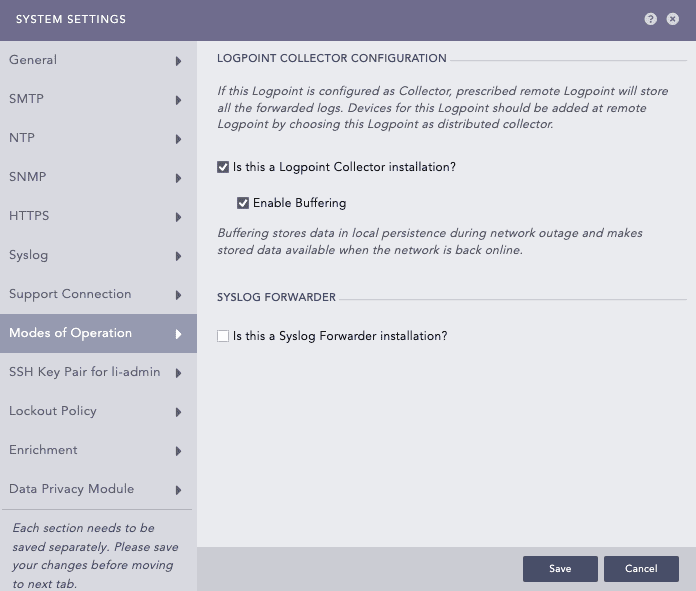
Configuring Logpoint Collector
In LOGPOINT COLLECTOR CONFIGURATION, select Is this a Logpoint Collector installation?.
Select Enable Buffering to store the data in local persistence during a network outage. By default, the logs are stored in the buffer for 7 days. If you want to change the default retention period, contact Logpoint Support.
Click Save.
Switch to the Main Logpoint.
6.1. Go to Settings >> System Settings from the navigation bar and click Open Door.
6.2. Enable Open Door.
6.3. Note the Private IP and the Password.
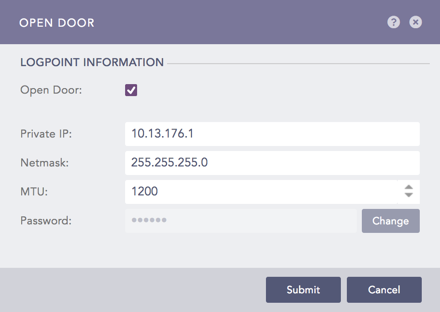
Enabling Open Door
Switch to the Collector Logpoint.
7.1. Go to Settings >> Configuration from the navigation bar and click Remote Logpoint.
7.2. Enter the IP Address of the Main Logpoint, the Password, and the Private IP.
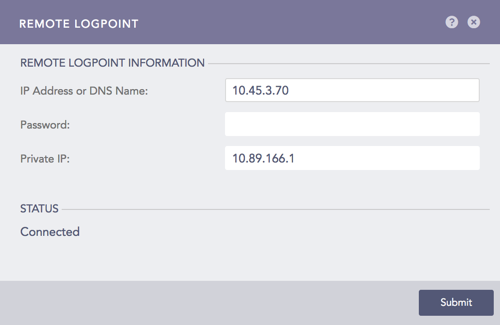
Configuring Remote Logpoint
The Collector is automatically added under Settings >> Configuration from the navigation bar and click Distributed Collector in the Main Logpoint. Activate it from the Actions column.

Configured Collector setting in Main LP
You can use the Collector to collect logs by adding it as a device in the Main Logpoint. Main Logpoint is primarily used to create dashboards and monitor, configure, and analyze the logs on the connected Logpoints.
In the Main Logpoint, go to Settings >> Configuration from the navigation bar and click Devices.
Click ADD.
Specify the Collector as a Distributed Collector.
To verify the connection between the devices, switch to the Collector Logpoint. Go to View Devices from the navigation bar.
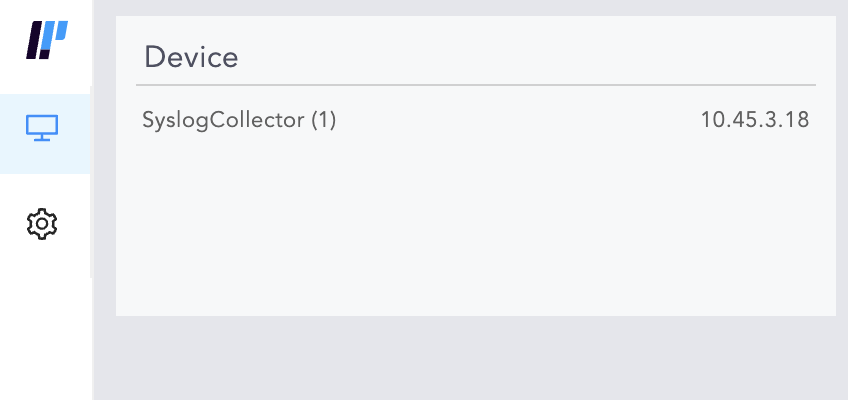
Device Setting - View Devices
To distinguish logs collected and normalized through the Collector, you can use the system defined field, collected_at in the search query. If you disable the Collector, make sure that you remove it from the list of devices on the Main Logpoint. If you change the password on the Collector machine from Settings >> Remote Logpoint, all the services of the Collector restart. The logs are not collected until the Collectors and Fetchers are up and running.
Syslog Forwarder collects logs from different sources, normalizes them using the signatures applied, and forwards them to a configured Logpoints and a target storage. Unlike Logpoint Collectors, Syslog Forwarder can not act as a buffer.
Syslog Forwarder was implemented to introduce the concept of Air Gap. The Main Logpoints are usually located in high-security zones whereas Syslog Forwarders and other devices are in low-security zones.
Go to Settings >> System settings from the navigation bar and click System Settings.
Select Modes of Operation.
In SYSLOG FORWARDER, select the Is this a Syslog Forwarder installation?.
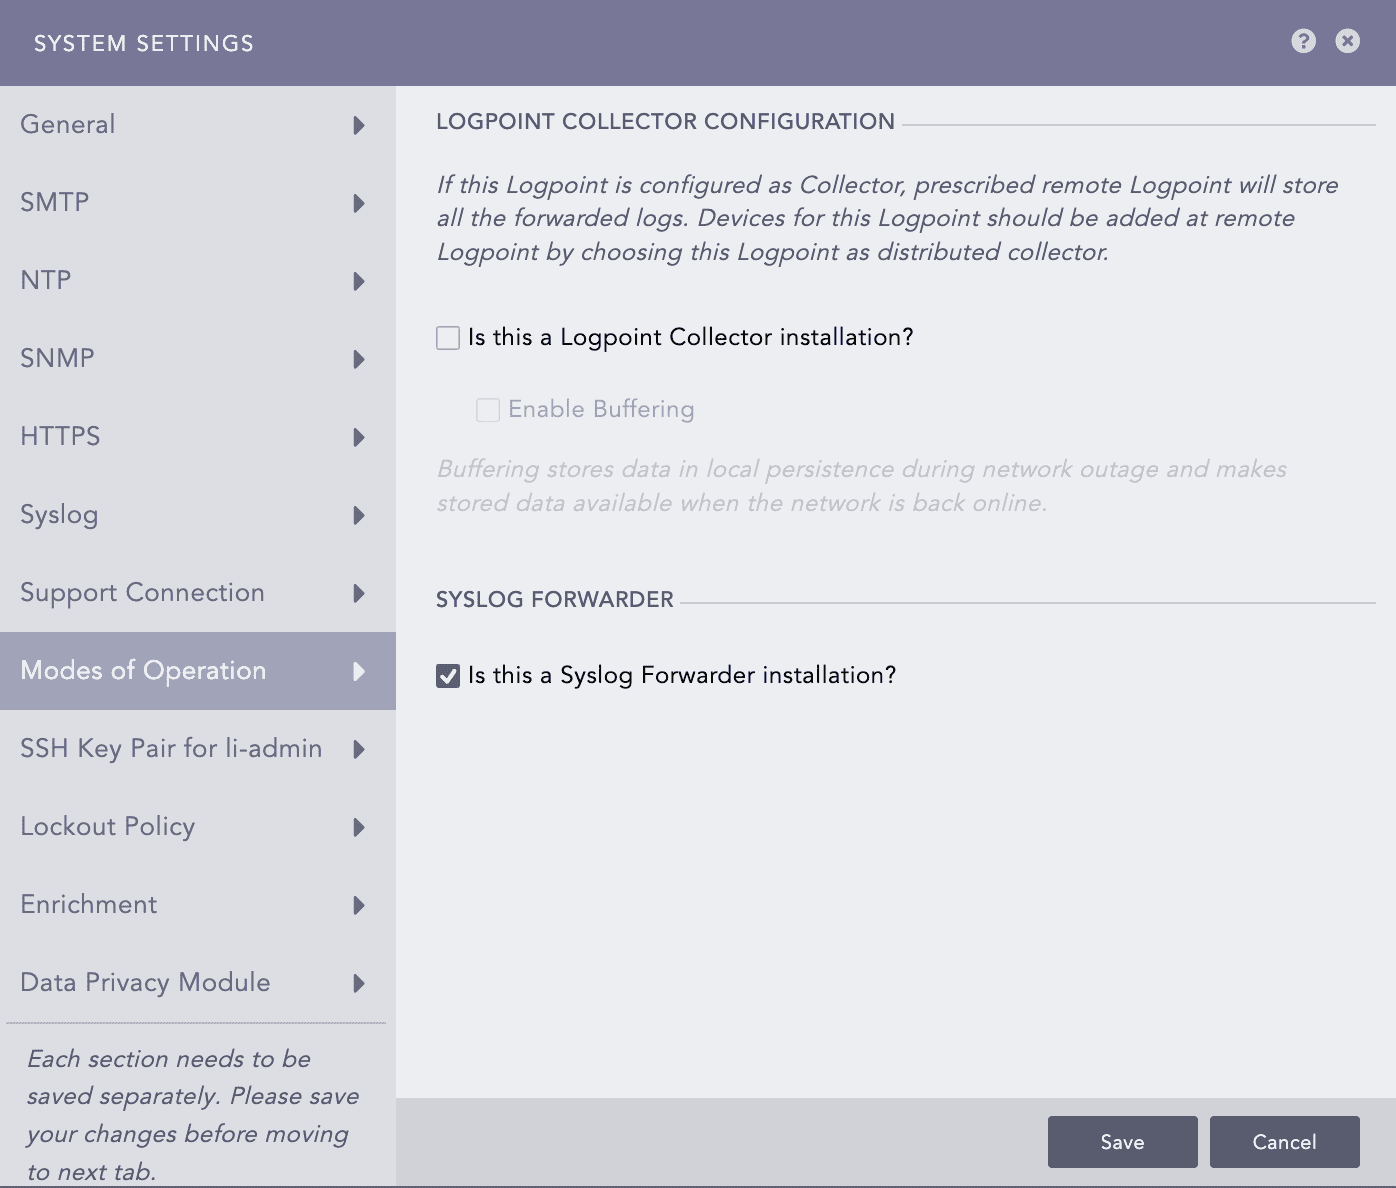
Modes of Operation - Syslog Forwarder
Click Save.
To use a Syslog Forwarder after converting it, you need to:
Export a config file
Import the config file
Add target
Add devices
Exporting a config file
Switch to the Main Logpoint and go to Settings >> Configuration from the navigation bar and click Distributed Logpoints.
Add a Syslog Forwarder. Go to Adding a Syslog Forwarder for more information.
Click the Export configuration icon ( ) in the Actions column. The config file is downloaded on your machine.
Importing the config file
Switch to the Syslog Forwarder and go to Settings >> System Settings from the navigation bar and click Sync.

Sync config file
Click Import Data.
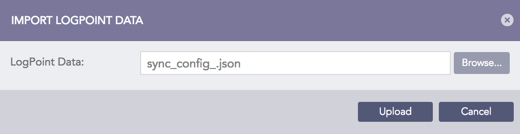
Import config file
Browse for the config file saved earlier.
Click Upload.
Adding a Target
Targets are Logpoints that receive logs from Syslog Forwarder.
On the Syslog Forwarder, go to Settings >> Configuration from the navigation bar and click Syslog Forwarder.
Click Targets.
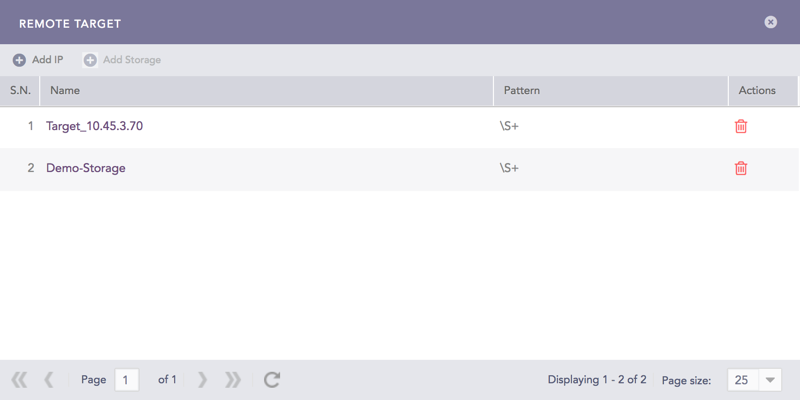
Remote Target
Click Add IP.
Enter the Name and IP address of the target.
Specify the Pattern of the logs to be forwarded. If you do not specify a pattern, all the logs are forwarded.
Enter a Port number for the input port of the remote target machine.
Select Enable UDP to use the User Datagram Protocol (UDP). If you do not select it, TCP is used.
If you Enable UDP, choose the UDP Size (In Bytes).
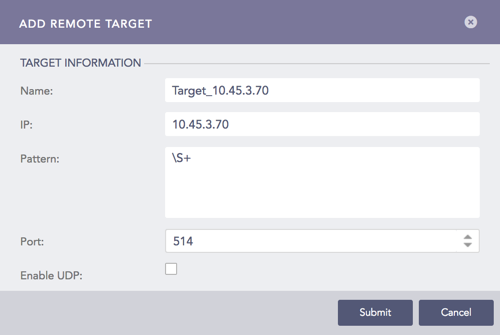
Add IP
Click Submit.
Adding a Target Storage
Target storage enables airgap in low-security zones. You can add multiple Remote Targets but only one Target Storage. Add Storage is dimmed once the configuration for a target is complete. For each IP added as the Remote Target, add Syslog Forwarder in the respective target Logpoint.
On the Syslog Forwarder, go to Settings >> Configuration from the navigation bar and click Syslog Forwarder.
Click Targets. Click Add Storage.
Enter the Name of the storage.
Specify the Path to the remote storage. The format of the path should be:
//<IP Address>/<Path>/
For example: //192.168.2.247/storage/
Specify the Pattern of the logs to be forwarded. If you do not specify a pattern, all the logs are forwarded.
Enter the Username and the Password.
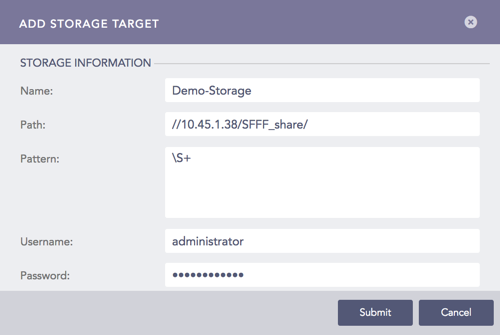
Add Storage
Click Submit.
Adding a Device
On the Syslog Forwarder, go to Settings >> Configuration from the navigation bar and click Syslog Forwarder.
Click Add. Device lists all the devices configured as the Syslog Forwarder in the Main Logpoint.
Select devices by double-clicking on them.
Enter Remote Target(s). It can be a remote IP or a remote storage.
Click Submit.
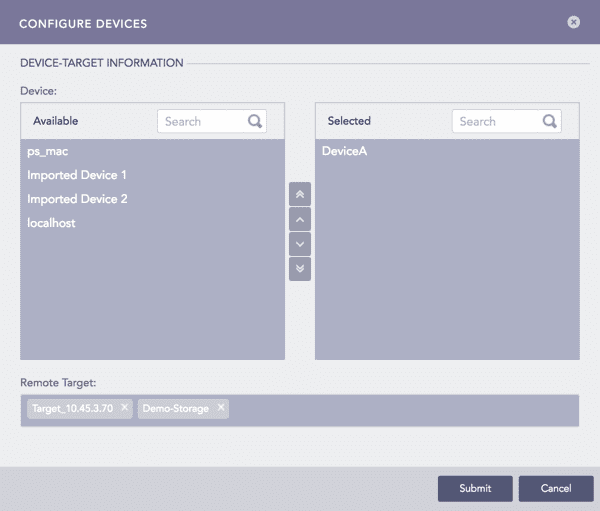
Configure Devices
The logs stored in storage device contains the device_name=”<end device name>”. Use search query device_name=<end_device_name> to verify the logs from the remote target.
Go to Settings >> Configuration and click on Devices.
Find the Remote Target and click on the “+” icon in Actions.
Select Syslog Forwarder File Fetcher.
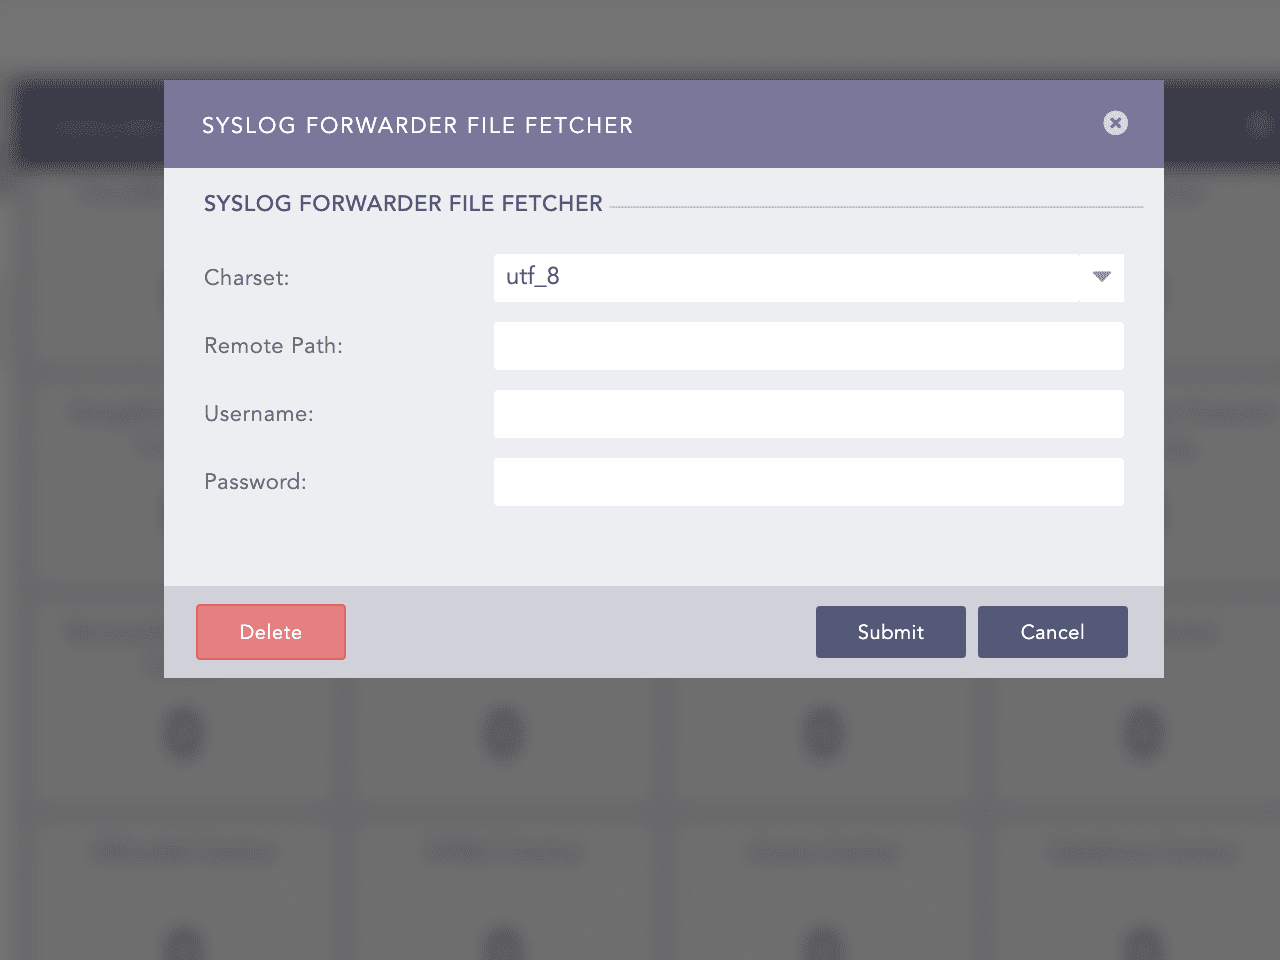
Adding Syslog Forwarder File Fetcher
Add Syslog Forwarder File Fetcher with following details:
Charset: <desired charset> (utf8 by default)
Remote Path: <add the path of the remote storgae>
Username: <username of remote machine>
Password: <system password of remote machine>
Click Submit.
A Logpoint Administrator can generate SSH certificates for the li-admin.
Go to Settings >> System Settings from the navigation bar and click System Settings.
Select SSH Key Pair for li-admin.
Enter a Pass Phrase.
Click Regenerate Key Pair.
The Lockout Policy lets the admin users control user login and password security. After a user is locked out, a User Locked icon appears in the Actions column of the respective user under Settings >> User Accounts from the navigation bar and Users. The Logpoint administrator can unlock the locked users by clicking the icon.
Lockout threshold: The number of failed login attempts that locks a user account. The default is five attempts. You can set the threshold anywhere from 0 to 999, where 0 means a user account is never locked.
After three consecutive failed login attempts, the use of CAPTCHA authentication in addition to the username and password is required. If there are additional unsuccessful login attempts, due to a wrong username, password, or CAPTCHA authentication, and the specified lockout threshold is reached, an account is locked for the specified lockout duration.
Lockout duration: The number of minutes an account remains locked. By default, the lockout duration is 30 minutes. When the lockout duration is over, there is one more login attempt. If this attempt fails, the account is locked for the additional specified lockout period. This process continues until a user logs in with valid credentials. The lockout duration can be between 1 to 99999.
Go to Settings >> System Settings from the navigation bar and click System Settings.
Select Lockout Policy.
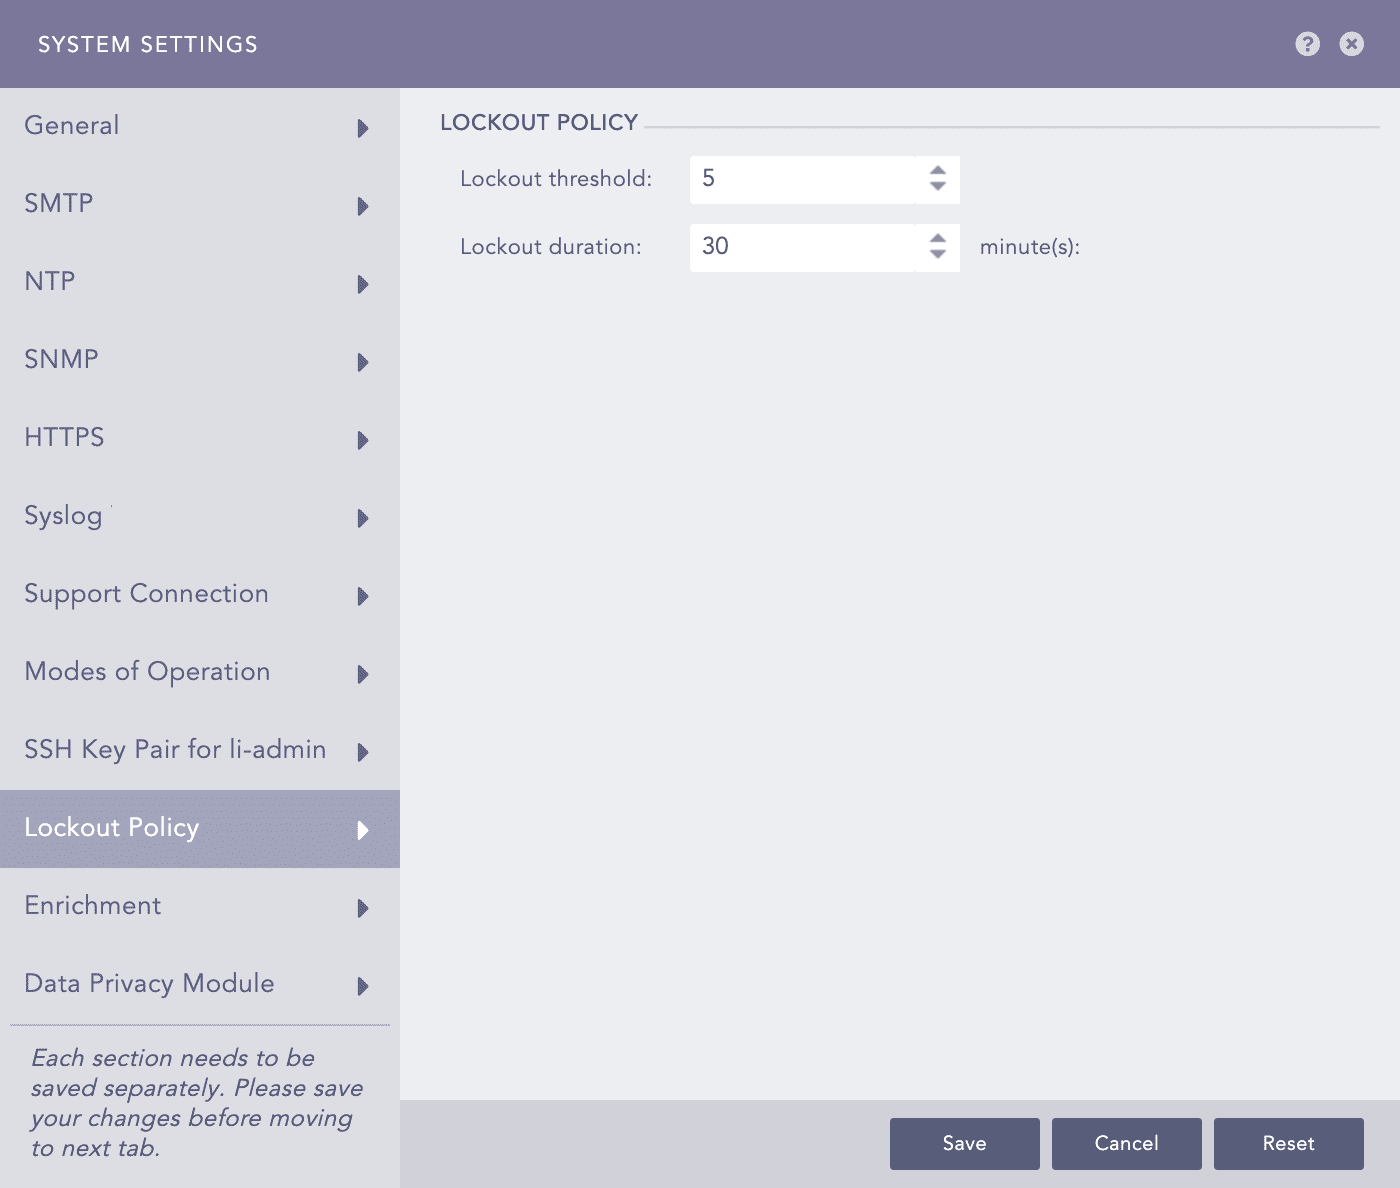
Configuring Lockout Policy
Select a Lockout threshold from the dropdown. The default is 5.
Enter the Lockout duration. The default is 30 minutes.
Click Reset if you want to reset the values to default.
Click Submit.
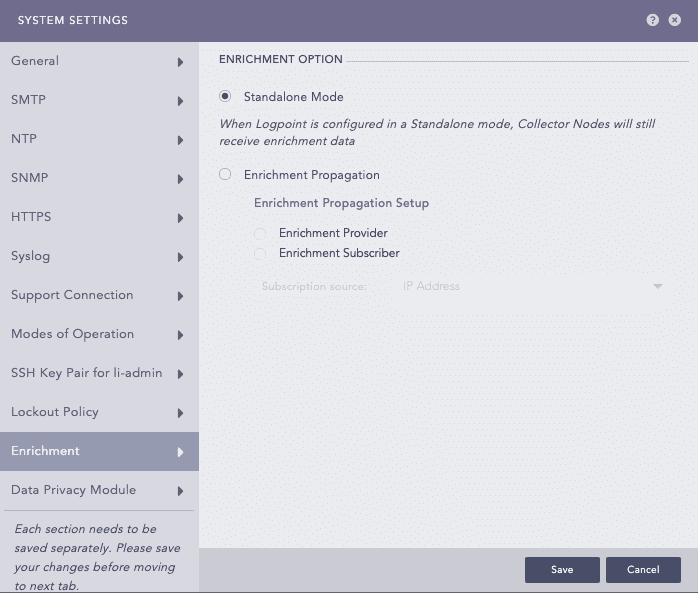
Enrichment settings manage data enrichment in Standalone Mode and Enrichment Propagation Mode. In Standalone Mode, all enrichment tasks are conducted on one Logpoint, which handles both adding enrichment sources and performing the enrichment locally. Enrichment Propagation Mode uses multiple Logpoint machines distributed across a network. Go to Enrichment Sources for more information.
Before configuring Enrichment in either of the modes, it is necessary to configure some prerequisites in Logpoint. These essentials include Enrichment Sources, Enrichment Policies, Normalization Policies, and Processing Policies.
Integrations associated with the enrichment sources need to be installed before adding an enrichment source. For example, if you need to add an ODBC enrichment source, the ODBC Enrichment Source integration must be present in the Logpoint.
Enrichment settings manage whether you use Standalone Mode and Enrichment Propagation. To learn how to setup Enrichment, go to Enrichment Sources.
In Standalone Mode, you need to add enrichment sources to Logpoint and perform the enrichment in the same Logpoint. To use enrichment from other Logpoints, see Enrichment Propagation.
Go to Enrichment Sources for details on adding enrichment sources.
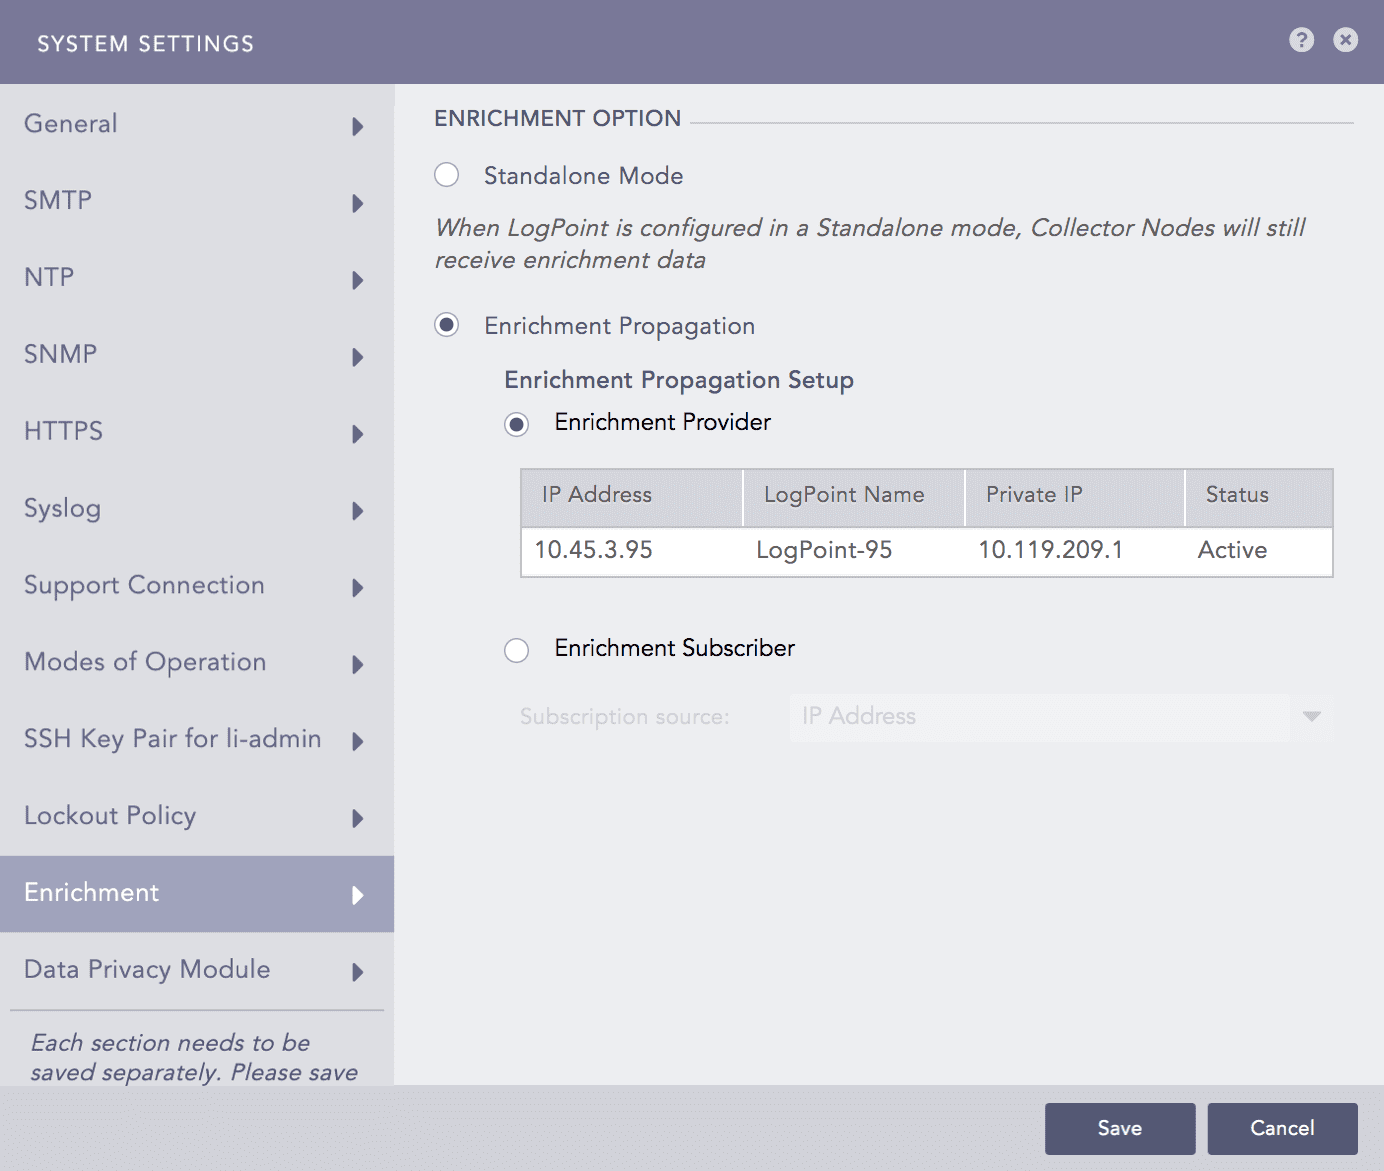
Enrichment Propagation uses multiple Logpoints to perform enrichment tasks. A Logpoint machine can be either an enrichment provider or an enrichment subscriber. You must set up a Distributed Logpoint connection to configure Logpoint in the Enrichment Propagation mode.
Enrichment Provider: Collects raw data and shares it with enrichment subscribers. It keeps a list of all the IP Addresses of enrichment subscribers.
Enrichment Subscriber: Receives enrichment data from an enrichment provider to create rules for the enrichment process. It also acts as a bridge between a Logpoint Collector and an enrichment provider. For Enrichment Subscribers, the Enrichment Sources option in
Settings >> Configurationpage is disabled. They have to use the sources of an enrichment provider.You can have any number of enrichment subscribers but only one enrichment provider. One enrichment provider can be connected to:
A single enrichment subscriber
Multiple enrichment subscribers
A single enrichment subscriber connected to a Logpoint Collector
Multiple enrichment subscribers connected to multiple Logpoint Collectors
When setting up Enrichment Propagation, make sure to configure an Enrichment Provider first. After setting up an Enrichment Provider, then setup the Enrichment Subscribers. When setting up an existing Logpoint instance as an Enrichment Subscriber, you need to delete all existing enrichment policies and their dependencies before configuring it as an enrichment subscriber.
While removing the UEBA_ENRICHMENT_POLICY and Threat_Intelligence enrichment policies, remove Threat Intelligence and UEBA PreConfiguration too. After successfully removing the enrichment policies, manually install both the applications in the new enrichment subscriber.
Go to Settings >> System Settings from the navigation bar and click System Settings.
Select Enrichment.
Select Enrichment Propagation.
Select Enrichment Provider or Enrichment Subscriber as needed. If you select Enrichment Subscriber, choose a Subscription Source, which is the IP address of an enrichment provider from the dropdown menu.
Selecting the Enrichment Propagation mode for Enrichment
Click Save.
The following scenario depicts an enrichment process in the Enrichment Propagation mode with a configuration of 2 machines: Machine 1 and Machine 2.
Select Enrichment Provider in Machine 1 and Enrichment Subscriber in Machine 2.
Configuring Machine 1 as an Enrichment Provider

Configuring Machine 2 as an Enrichment Subscriber
Next, add a CSV Enrichment Source to Machine 1 using the data from the following CSV file.
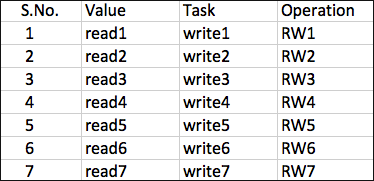
CSV File
After adding the source, add a normalization package containing log signatures to Machine 2. Refer to the Normalization Packages for details on adding normalization packages.
Furthermore, add a normalization policy, enrichment policy, and routing policy to Machine 2. Refer to the Normalization Policies, Enrichment Policies, and Routing Policies for details.
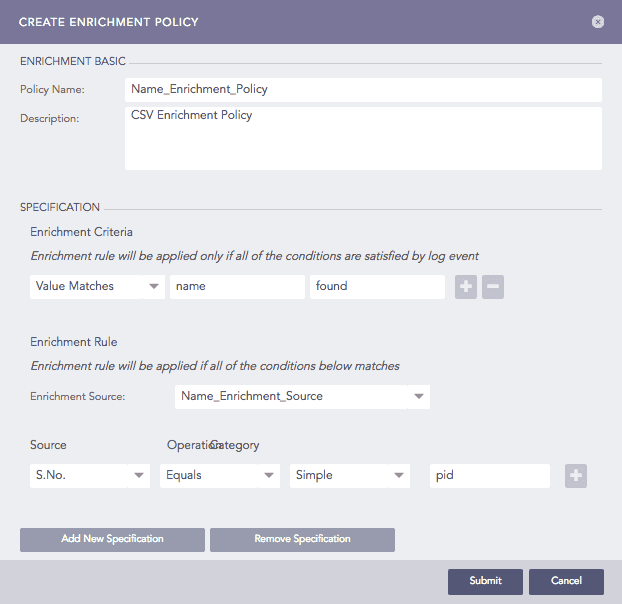
Adding an Enrichment Policy
Finally, add a processing policy to incorporate all the policies earlier created and add it to a device. Refer to the Processing Policies for details on adding processing policies. In the Standalone Mode, all the above tasks are performed in a single machine.
You can now see the enriched results in the search results of the enrichment subscriber.
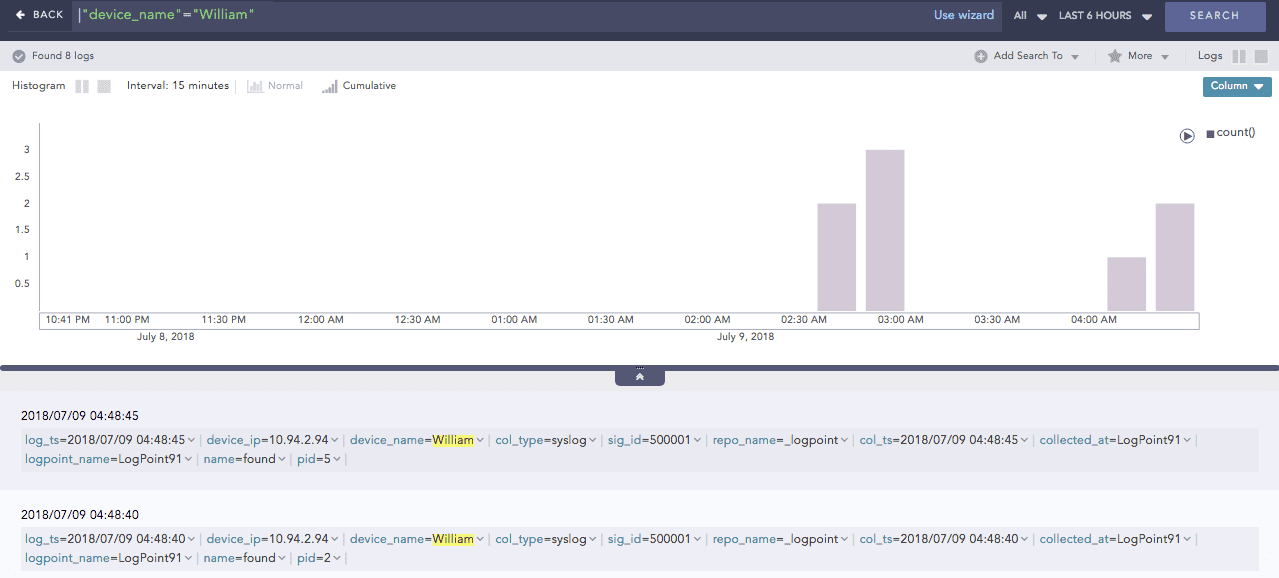
Non-enriched log result
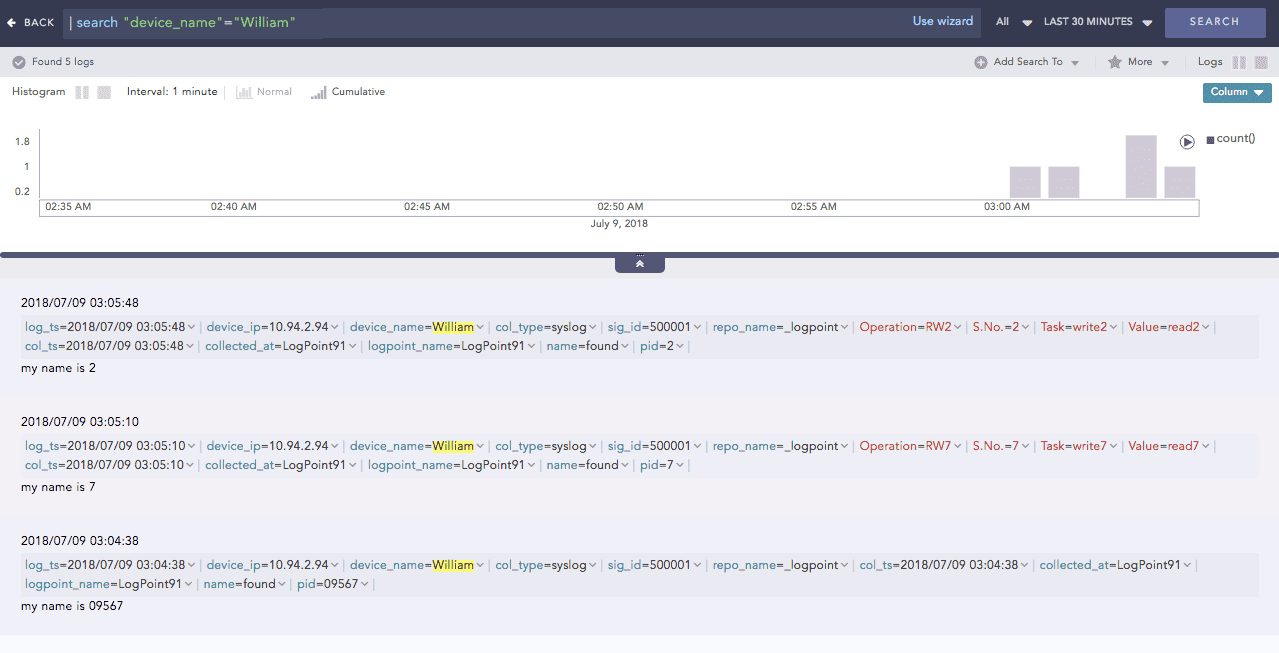
Enriched log result
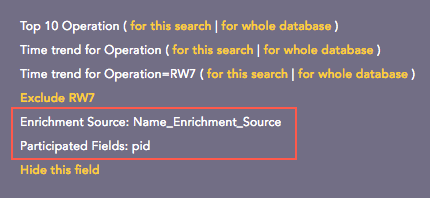
Click the dropdown menu on the enriched fields to view the different actions.
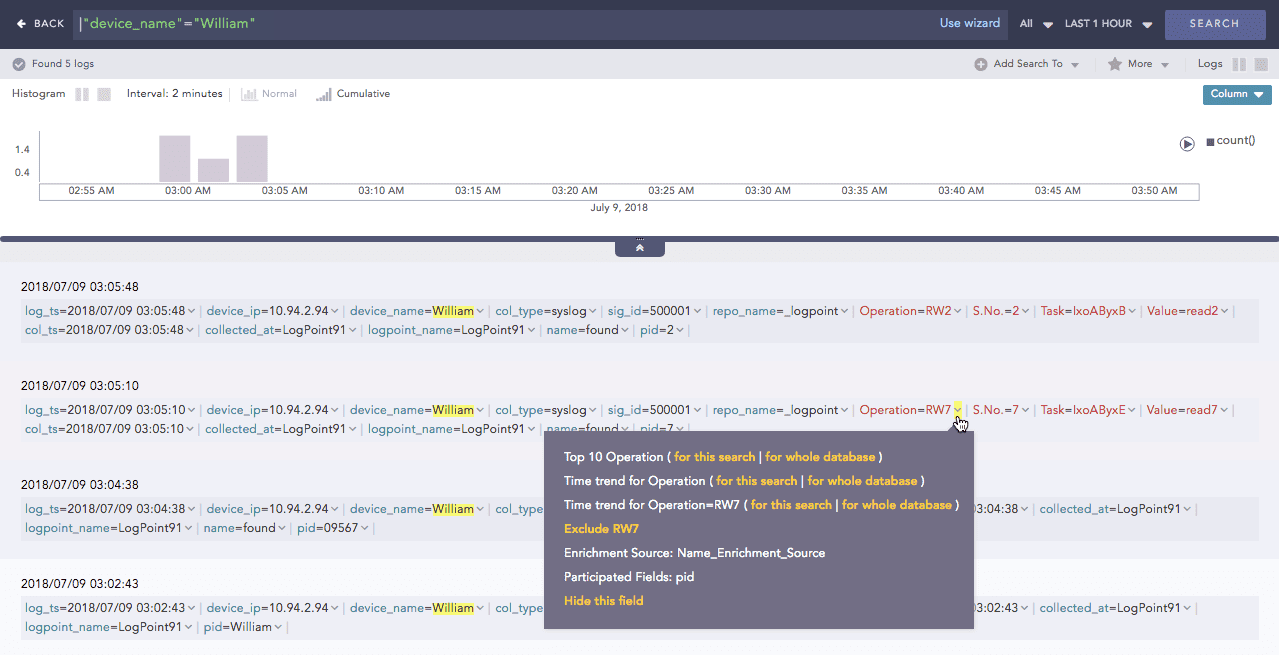
Actions in enriched results
Enrichment Source: Displays the information of the source file the enriched field belongs to.
Participated Fields: Displays the field of a log specified in the enrichment rule to enrich the log.
Actions
In the above example, the Participated Field pid has been specified in the earlier created enrichment rule. The enrichment rule matches the value of the pid field in the log to the S.No. field in the source and enriches the log.